painting wall bright blue with roller

DIY Advice On Renovating Furniture

Decking My Hall

painting wall bright blue with roller
DIY Blogger Diane Henkler of InMyOwnStyle.com tells Glidden® how she gets into the holiday spirt with more than your traditional green, red and silver bells.
DIY Advice On Renovating Furniture
It’s that time of the year—time to add holiday décor to my home. I use the traditional colors of Christmas, red and green on the exterior of my house, but on the inside, I leave tradition behind and use my favorite colors to make the rooms come alive for the season.

I always make sure to deck my foyer at the outset, as this is the first place a friend or visitor sees as they enter your home. The space can set the mood and make a memorable first impression, and transitions your guests from the impersonal outside world to the welcoming warmth of your home. Making it look, feel, and smell like the holidays will truly make them feel welcomed.

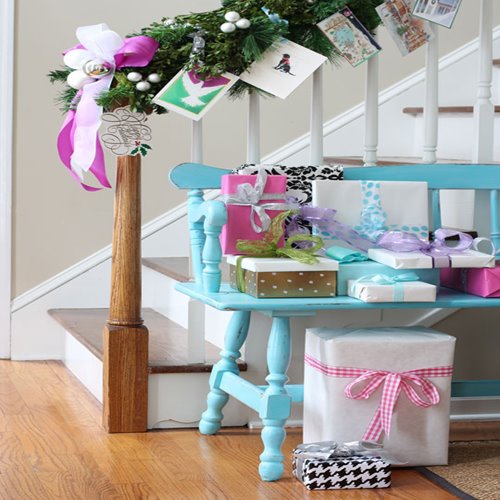
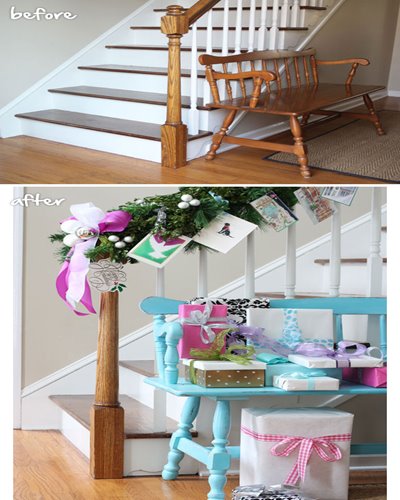
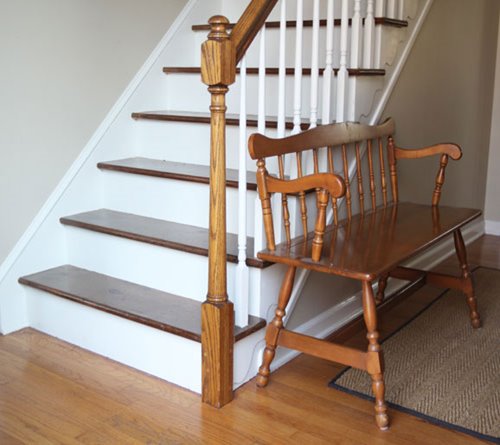
This year, I’m adding a bench to my foyer to add a pop of bright, cheery color. The bench was in good shape, but just too brown for my taste—so I painted it using leftover paint I had from other projects.
 
Browse Paint Colors
Traditional Wooden Bench in Foyer

Before and After Hallway

Sprucing Up The Hallway

It’s that time of the year—time to add holiday décor to my home. I use the traditional colors of Christmas, red and green on the exterior of my house, but on the inside, I leave tradition behind and use my favorite colors to make the rooms come alive for the season.

I always make sure to deck my foyer at the outset, as this is the first place a friend or visitor sees as they enter your home. The space can set the mood and make a memorable first impression, and transitions your guests from the impersonal outside world to the welcoming warmth of your home. Making it look, feel, and smell like the holidays will truly make them feel welcomed.

This year, I’m adding a bench to my foyer to add a pop of bright, cheery color. The bench was in good shape, but just too brown for my taste—so I painted it using leftover paint I had from other projects.
 
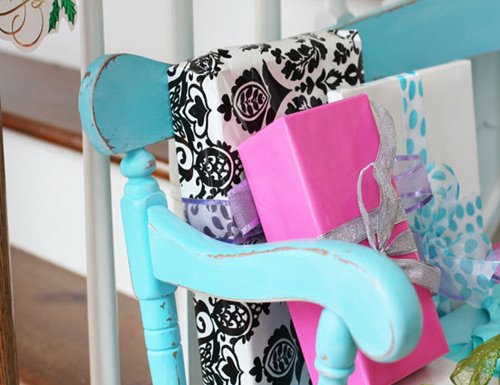
Adding a little paint to the bench in the hallway helped add some holiday spirit in my entryway. 

Here's my Before and After bench

Adding a little paint to the bench in the hallway helped add some holiday spirit in my entryway. 
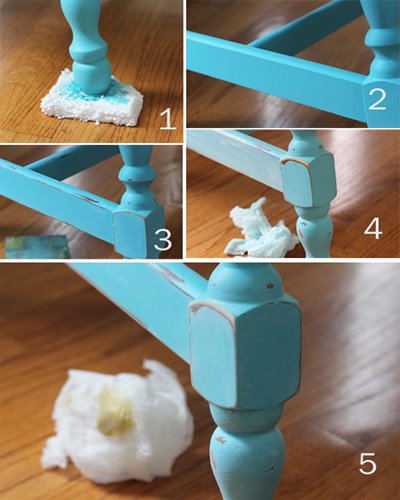
You can age a piece of furniture too. Just follow these instructions of supplies you'll need.
  1. Primer and Paint
  2. 1"-2" wide angled paint brush
  3. Medium grit sandpaper or sanding block
  4. Tack cloth
  5. Clear paste wax
  6. Clean soft rags or cloths
  7. Foam blocks
  8. Optional: glazing liquid, white paint
Browse Our Products
Bench being prepped and painted to get an "aged" look

Step by step process of how to paint a bench

How To Paint and Age Furniture

You can age a piece of furniture too. Just follow these instructions of supplies you'll need.
  1. Primer and Paint
  2. 1"-2" wide angled paint brush
  3. Medium grit sandpaper or sanding block
  4. Tack cloth
  5. Clear paste wax
  6. Clean soft rags or cloths
  7. Foam blocks
  8. Optional: glazing liquid, white paint
  1. Place the piece to be painted on foam blocks. This will make it easier to paint the bottom edges.
  2. I mixed Glidden Paint and Primer in white with Glidden flat latex paint in Blue Paisley. Doing this lightened up the paint quite a bit, which I wanted. Since I used the primer and paint in one, I saved myself one step. Note: If you want to age your piece with sandpaper, make sure to have your primer tinted the same color as your paint. If you use the primer as-is when you sand, you will see the white layer come through.  When mixing products together at home, watch to make sure paints mix together and are compatible. Also, be careful with at home mixing to make sure you mix enough for your project from the beginning or you could be left partially through the project without the correct color.
  3. Sand the entire piece with sanding block*. Remove grit and dust with a tack cloth.
  4. Apply one light coat of paint/primer mixture and let dry. Add one more coat and let dry thoroughly. (If you’re using primer separately, put one coat of that on before you paint.) Before aging the piece, let the paint cure for a day or two to help with adhesion.
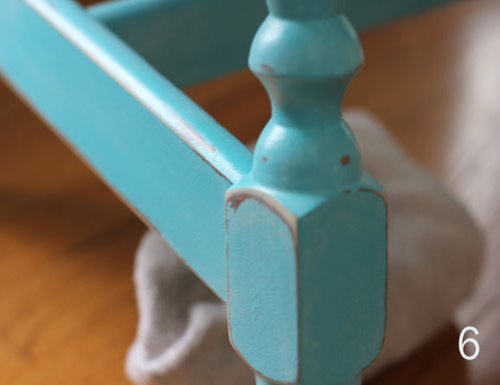
  5.  Once cured, use the sanding block to rough up the edges. Don’t be afraid—just run it along the edges with varying pressure. Make sure to age the piece all over. Sand more on arms and drawer edges or where the piece is normally touched and would wear faster. Clean off grit with tack cloth.
  6. Optional: I wanted to add a little depth to the surface and mixed clear glazing liquid with the white paint and primer. I created a 70% glaze, 30% paint mixture. Use a soft cloth and wipe it over the painted areas, then quickly rub off. If you get too much on in any area, dampen a cloth with water to remove. Repeat the process over entire piece. Let dry.
  7. Using a soft cloth, apply a very thin layer of clear paste wax over all painted areas. Let dry for about 30 minutes or until it looks hazy.
  8. Use a clean soft cloth to buff the finish to a soft shine. This adds a nice patina and a protective layer to your painted finish.
1,2,3 step images for painting bench

Buff waxed bench leg

Instructions

  1. Place the piece to be painted on foam blocks. This will make it easier to paint the bottom edges.
  2. I mixed Glidden Paint and Primer in white with Glidden flat latex paint in Blue Paisley. Doing this lightened up the paint quite a bit, which I wanted. Since I used the primer and paint in one, I saved myself one step. Note: If you want to age your piece with sandpaper, make sure to have your primer tinted the same color as your paint. If you use the primer as-is when you sand, you will see the white layer come through.  When mixing products together at home, watch to make sure paints mix together and are compatible. Also, be careful with at home mixing to make sure you mix enough for your project from the beginning or you could be left partially through the project without the correct color.
  3. Sand the entire piece with sanding block*. Remove grit and dust with a tack cloth.
  4. Apply one light coat of paint/primer mixture and let dry. Add one more coat and let dry thoroughly. (If you’re using primer separately, put one coat of that on before you paint.) Before aging the piece, let the paint cure for a day or two to help with adhesion.
  5.  Once cured, use the sanding block to rough up the edges. Don’t be afraid—just run it along the edges with varying pressure. Make sure to age the piece all over. Sand more on arms and drawer edges or where the piece is normally touched and would wear faster. Clean off grit with tack cloth.
  6. Optional: I wanted to add a little depth to the surface and mixed clear glazing liquid with the white paint and primer. I created a 70% glaze, 30% paint mixture. Use a soft cloth and wipe it over the painted areas, then quickly rub off. If you get too much on in any area, dampen a cloth with water to remove. Repeat the process over entire piece. Let dry.
  7. Using a soft cloth, apply a very thin layer of clear paste wax over all painted areas. Let dry for about 30 minutes or until it looks hazy.
  8. Use a clean soft cloth to buff the finish to a soft shine. This adds a nice patina and a protective layer to your painted finish.
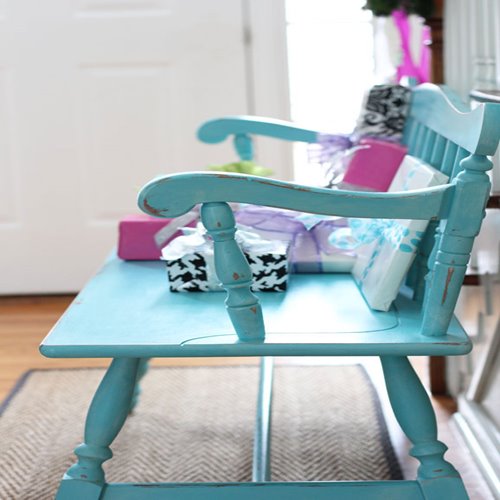
No more brown—just the perfect pop of fun and festive color to greet my guests…

…and for my family and I to enjoy as we pass by it on a daily basis.

Finished Look

No more brown—just the perfect pop of fun and festive color to greet my guests…

…and for my family and I to enjoy as we pass by it on a daily basis.
I also want to add a few more simple but festive elements that will make the space look and feel a little bit more like Christmas.
  • I have a pine-scented candle ready to light once the pine and boxwood garland loses its scent, so the space never loses that Christmas smell.
  • I plan to add white twinkly lights to the garland going up the stairs. It looks dreamy at night when no other lights are on.
  • I am tying on the Christmas cards I get to the garland using a hole-punch and colorful snippets of ribbon.
  • Tie a collection of jingle bells on the door knob with pretty ribbon so when you or your guests come and go you are greeted with a sound of the season.
  • Holiday décor is not complete until favorite holiday music is playing throughout the entire house. The iPod and speakers are ready.
From my house to yours—wishing you a bright and colorful holiday season!

As always, safety first!  Please refer to the Product Label, Technical Data Sheet (TDS) or Safety Data Sheet (SDS) for safety and detailed application instructions.

Find Your Favorite Paint Colors

*WARNING! If you scrape, sand, or remove old paint, you may release lead dust. LEAD IS TOXIC. EXPOSURE TO LEAD DUST CAN CAUSE SERIOUS ILLNESS, SUCH AS BRAIN DAMAGE, ESPECIALLY IN CHILDREN. PREGNANT WOMEN SHOULD ALSO AVOID EXPOSURE. Wear a NIOSH-approved respirator to control lead exposure. Clean up carefully with a HEPA vacuum and a wet mop. Before you start, find out how to protect yourself and your family by contacting the National Lead Information Hotline at 1-800-424-LEAD or log on to www.epa.gov/lead

Adding Accessories

I also want to add a few more simple but festive elements that will make the space look and feel a little bit more like Christmas.
  • I have a pine-scented candle ready to light once the pine and boxwood garland loses its scent, so the space never loses that Christmas smell.
  • I plan to add white twinkly lights to the garland going up the stairs. It looks dreamy at night when no other lights are on.
  • I am tying on the Christmas cards I get to the garland using a hole-punch and colorful snippets of ribbon.
  • Tie a collection of jingle bells on the door knob with pretty ribbon so when you or your guests come and go you are greeted with a sound of the season.
  • Holiday décor is not complete until favorite holiday music is playing throughout the entire house. The iPod and speakers are ready.
From my house to yours—wishing you a bright and colorful holiday season!

As always, safety first!  Please refer to the Product Label, Technical Data Sheet (TDS) or Safety Data Sheet (SDS) for safety and detailed application instructions.

Find Your Favorite Paint Colors

*WARNING! If you scrape, sand, or remove old paint, you may release lead dust. LEAD IS TOXIC. EXPOSURE TO LEAD DUST CAN CAUSE SERIOUS ILLNESS, SUCH AS BRAIN DAMAGE, ESPECIALLY IN CHILDREN. PREGNANT WOMEN SHOULD ALSO AVOID EXPOSURE. Wear a NIOSH-approved respirator to control lead exposure. Clean up carefully with a HEPA vacuum and a wet mop. Before you start, find out how to protect yourself and your family by contacting the National Lead Information Hotline at 1-800-424-LEAD or log on to www.epa.gov/lead